Showing posts with label m38. Show all posts

Monday, 20 January 2025

Electrical Work - Personal and on a Jeep

With the cold weather, and well, life, my progress on the m38 has slowed a bit. I was due for an ICD (Implanted Cardioverter Defibrillator) replacement which was going to put me on light duty for a few weeks while I healed up, so my wife kicked me to the garage (my happy place). 


I took the time to tackle the remaining wiring and mounting for my GM alternator conversion. I built the brackets earlier (Read about that here). I was never satisfied with the upper mount, so I had to come up with a better and more solid solution. A convenient piece of tube and a switch from threaded rod with nuts to a bolt really changed it for the better. 
 
 For the wiring, rather than a dash light, I wired a diode inline to excite the alternator when the ignition coil is engaged. The diode will prevent feedback when I shut it off. A short universal battery cable from Princess Auto completed the wiring to the positive on the battery. Don't be like me, remember it goes to the Batt terminal, not the ground bolt on the alternator (Yeah, that was fun)

 
All my cables are routed and neatly bundled with fabric wiring harness tape. I decided to try it out after a segment in a video from Sarah-n-Tuned. Seems like it may hold up better than electric tape under the hood. 


Monday, 29 July 2024

Trackick Build List

I'm currently working through Brennan's Garage excellent Trackick brake conversion on the m38. The kit from Brennan is a set of brackets (two sets in my case - 4 wheel disk) that allows mounting of Geo Tracker (and the like) calipers and disks. A complete part list from RockAuto (and Amazon) is provided at the end of this article.

 
The first step is ridding the axles of the drums, hardware, and backing plates. I took the opportunity to inspect, replace, and lube all my bearings. The Trackick braket bolts to the axle using the same bolts that held the drum backing plates on (and mounts the spindles on the front).


Once the brackets are mounted and hardware is torqued to spec, the disks slide on. In my case, I did have to open up the lug holes to match my new studs. Your mileage may vary, just be aware that making parts from different vehicles fit isn't always an exact science. After the disks, it time to mount the calipers. Brennan includes mounting bolts and spacers to line everything up accordingly.

The flex hoses are Chevy S10 lines. The front's will reach the stock hard lines, while the rears will require some moddification to the hard lines to make space and accomodate the flex lines.


RockAuto parts list - full disclosure, I found the calipers local for a little cheaper in Canadian dollars
2 x DYNAMIC FRICTION 33147009
2 x DYNAMIC FRICTION 33147008
2 x CENTRIC 90848009 OE Grade
4 x DORMAN H380280

Some M10x1.0mm banjo bolts from Amazon
I went all new, but remanufactured is also an option.

For reference, I used these as vehicles:
1994 Geo Tracker for disks, calipers, and pads.
1998 Chevy s10 for flex lines.

Wednesday, 3 July 2024

Not putting the brakes on...yet

I mean, I'm working towards putting the brakes on, however there are building blocks to get there. 


I spent the Canada Day long weekend working on the m38. I replaced all the wheel studs (well, all except the one that I was shorted), rebuilt the front hubs with fresh bearings, and ran the new brake lines along the axles.

Next up on the list is the new master cylinder and the front and rear brake lines.
 
The order is in with the remainder of the parts needed. Calipers, pads, rotors, etc. shortly after those are in my grubby little hands the Jeep is going to have brakes. 

To be clear this will mean it has a running engine and [will have] working brakes. My driveway is about 50' long, and I sense I may be taking my first 100' road trip before the end of summer. 
 
Front axle lines installed, the kit from Omix-Ada is a pretty accurate fit

The back lines are much like the front. We'll call it a solid "good enough for this guy" fit.

The new Master Cylider is on the bench, waiting.


Sunday, 28 May 2023

Six weeks to install an alternator, seems reasonable


Way back in the early days of Spring (or is it late days of Winter?) I started to build a bracket to convert the m38 from a generator to an alternator. All was moving along quiet well with the lower adapter for the alternator, and I was ready to attach the upper bracket. This involved removing one water pump bolt to remove the old bracket, and replace it with the new one. 

And that's when things went south. The bolt broke off flush with the water pump. So now I had to move to remove the water pump. I drained out what was left of the coolant and and went to remove the other three bolts.... and broke another. Two did come out, so there's that. When I tried to get an extractor on the broken bolts, one did come out it was the other one that decided to break again flush with the block. 


Queue ordering reverse drill bits and a new water pump gasket. This lead to removing the grill and radiator from the Jeep. Fortunately, these old military rigs were built to be field serviced, and that only took about 20 minutes.

I centre punched the broken bolt and started with the smallest bit I had, slowly working up to 1/4". Once there, the remains were still firmly embedded in the threads. I managed to use a small punch to pull up an edge. With that done I moved up to regular bits (1/4" reverse was my largest) and managed to get the remains to release. Once that was done I was able to run a tap through. 


During reassembly I took the opportunity to finalize the alternator with the radiator out of the way, and while I did require a spacer to get it set, things went pretty smooth. I do need to add a 90 degree fitting to the bottom of my oil filter housing, and probably need a shorter belt. However, I can now finish off wiring for the charging system and continue on this marathon.


Sunday, 12 February 2023

Electrical and Fuel (and I'm still alive)

First off... I'm still alive. It's been a bit, and while I've been working on the Willys, I also have been dealing with life and dealing with said life. It's all good. 

Once I got the Go Devil, er, going, I started work on making it permanent. Since the mechanical fuel pump was a bit of a no go, I made the call to move to an electric pump. I sourced out a low pressure pump and got to work pluming and wiring it in. 

I've also mounted up a proper universal fuse panel in the second battery bay on the cowl, and started into wiring the Jeep to keep it safe and modernized, at least under the hood. From 10' away, it's still going to look like a '52 m38. 


I made a decision early on that the wiring was going to be modern(ish) and ordered in weather pak like connectors. I want to make sure everything can be removed for service, and replacement, as well, should it ever come to it, return to stock. 
With the dash wired, I mounted it (temporarily) for testing, and so I can continue to plug away. 


Right now I have an alternator on order, I'll need to make up some brackets for that. I also have wiring in hand to start wiring the lights. Aside from that, there's a laundry list of things still to do ... brakes, tires, steering, wheel bearings, cooling system, windshield, seats cushions, and so on and so on. I figure if I can get the alternator and cooling buttoned up, plus the parking brake at least, I should be able to "drive" it up and down my driveway to make working on it, and in the garage, a little easier. 


Saturday, 6 August 2022

The Go Devil Goes!


 Despite just being a week, the Go Devil that wouldn't go is now going. 

In a testament to the Jeep community, I put out my troubles to my group of Jeep buddies and had a bunch of excellent suggestions. The key being that timing appeared to be off, and most likely it would be 180. 

Forgive the quality - Taken from a video
To check, cylinder 1 has to be brought to TDC, Top Dead Centre. This is when the piston has reached the top of it's stroke, both valves are closed, and the air/fuel mix is compressed and ready for the spark. Then you rotate the engine so that it's 5 degrees before TDC, and where the rotor in the distributor sits, is here the number one spark plug wire should be connected. 


On a Go Devil, this puts the rotor in approximately the 5 o'clock point. If timing was 180 degrees out, it would point at 11. Since I couldn't find the timing marks on my engine, I had to rely on trusting the previous owners to have not mucked with it. 

I pulled the plugs and got out my trusting TDC tool, my thumb. By placing my thumb over the spark plug opening by turning the engine over I was able to get a feel for the four strokes, with the "burp" past my thumb being compression. At the same time, I had the distributor open, and was watching the rotor. What i discovered is that the engine wasn't 180 degrees out, but it wasn't firing spark plug 1 at 5 o'clock, it was more like 7. I attribute that to the non-stock distributor on the engine. 

In any case, once I moved the plug wires to their new location on the distributor cap, and double checked EVERY electrical connection, I was ready to try again. I fed some starter fluid through and it started. It surprised me, and elicited a very large laugh from me. I got out my gas squirt bottle, and went at it, and well, this video says it all. It started, and it's safe to say, the Go Devil engine is going. 


Tuesday, 2 August 2022

Just can't get it running

 Despite my best efforts, the little Go Devil engine, just doesn't want to, er, go. 

Since the last instalment (Here) I've been busy trying to get the engine do more than "pop". I've been trying to actually get it to run. Ultimately, I discovered that the rebuild I did on the carb just wasn't up to snuff. It was leaking out of places that it had no right to leak out of, and ultimately it was literally pouring fuel into the intake manifold, flooding out the engine. 

During this period, I also did a compression test to see if the engine was behaving, it turned out 80, 75, 60, 80 front to back, and on a cold engine. Not terrible, #3 was a little lower than I'd like, but we'll see what happens once it can warm up.


Since the carb ended up being a bust, I ended up ordering a Solex carburetor off Amazon. From what I've read, Mahindra makes these for Omix-Ada, and Mahindra has been playing the Jeep game for a while now. It's an interesting carb, in that it doesn't have a choke butterfly, it instead relies on a bypass valve of sorts that add extra fuel. Rather than choking the air, it adds more fuel. Interesting, and a mixed bag on reviews. For what it's worth, it's no longer flooding the engine, and it doesn't leak like the old YS Carb. 

I got it installed and setup, it was practically a bolt on swap. I had to make a new fuel line adapter, but it was a minor inconvenience, and from what I understand, a result of having an m38 rather than a CJ3A.


So, did it work? Short answer, no, long answer, no. The engine still won't run. I went back to the drawing board. I double checked the points, electrical, spark plug gaps, well, everything related to a running engine. I then pinged some people smarter than I am, and the consensus seems to be my timing may be off. If you have any thoughts, feel free to drop them in the comments section. 


At this point, stay tuned. I need to go dig out Grampa's timing gun, and pray that the distributor will come lose. I will get this thing running!


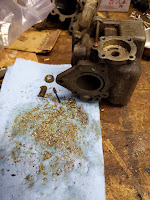
In other news, after staring at my two broken fuel pumps for a month, I had a thought - Could I take the good parts from them and make one working one?  Turns out that's a yes. The broken casting on the "new" one practically crumbled in my hand during disassembly, but I managed to salvage the arm, diaphragm, and spring. I transplanted those into the old pump's lower assembly, and while I could've used the old pump's upper, the internal valves were shot. I decided to mate it to the newer upper. I think it's quite usable, and the pump works well. It's not installed on the engine yet, I don't need it during my attempts to start the Jeep, but it's ready. 


Tuesday, 28 June 2022

Progress is progress.

 With the weather being nicer, and having a bit more free time as my son is able to entertain himself longer, time spent on the m38 is increasing. As more time is spent working on it, ambition and excitement continues to build, pushing me to spend more time working on it. 

I started off with finally picking up a battery. That in of itself was an easy enough task, well, as easy as a trip to Costco on a Saturday morning can be. 

All was going well in the garage after getting the battery hooked up. I got the oil filter housing back on, checked the torque on the oil pan bolts, and then went to bolt on the brand new fuel pump. While tightening the two bolts for the pump the flange broke off. I was barely above hand tight, so a part of me believes the casting was flawed. I put a blank cover plate on and decided to just use a gravity feed bottle to get some fuel into the carburetor. 


I managed to get the engine to pop a couple times, and it was about that time that I realized that I had not yet hooked up the oil pressure gauge. So the positive is that the engine makes oil pressure, the negative, is I squirted some oil out the side of the engine. I have an oil pressure test kit that I need to hook up before trying that again. 

Taking a break from the engine (I had actually forgotten that I owned the oil pressure test kit) I decided to start into the dash itself. I finished running the hand throttle and choke controls. Found the nut that holds the steering wheel on, and mounted all the gauges in the dash panel. That was pretty uneventful, but did require a trip to Princess Auto for some terminal connectors. Not that I need much excuse to zip on down to Princess Auto. 


Oil pressure lines for the dash are on order now, and with more open weekends ahead, I should be able to continue plucking off these small tasks, because any progress is still progress.


Soon... soon

Monday, 13 June 2022

Jeep m38 proving that things don't always go as planned.

If you've been around a while, you may have read my last update from April. (Right here

I outlined how I discovered antifreeze in my oil and decided a new head gasket was in order. A job that should take a couple hours at best on a flat head turned into a multi-week ordeal. Not being my full time job, meant I had to tackle this as time permitted, and like more things on Jeeps, it kinda snowballed. 

I wound up purchasing a stud remover, and asking the stuck stud to come out nicely with it. Which it did, so that's a win, and I did get the head removed. Much to my surprise, the pistons looks great, the block had no surprises, and everything was generally in order. Well, except when I drained the oil. 

The drain opened and started with green, followed by milkshake brown, then some actual oil, and then sludge. Lots of sludge. As much as I didn't want to, the oil pan was coming off. In it, I found a 1/4" of goo. It took a bit of time and some brake cleaner to get it to come out. Followed by cleaning up the pan and getting it spotless. 

I had to order in some more gaskets (note to future shade tree engine rebuilders, order the full gasket set at the start). 

Ultimately, the oil pan went back on, the valve cover got a new gasket, and the head went back on with it new copper coated Fel-Pro gasket. 

I have a set of new spark plugs, and we're just about down with that easy head gasket replacement. Next I need some high-zinc oil, some engine flush, and that should be it. Hopefully. 

The tunnel is a long one, but I can see some light twinkling at the end. 


As a small bonus for making it this far, here's the open engine turning over in all it's four cylinder glory. Something about being able to see everything running with the head off. Must be a flat head thing. 


Sunday, 24 April 2022

The Best Laid Plans...

After my attempt to start the old Jeep, and my discovery that there was coolant coming out the oil pressure port, I started sourcing a new head gasket.

Everything arrived over the past week, and I found a local source (NAPA) for copper head gasket spray.


Knowing that it's supposed to be pretty easy to swap out a head gasket on these Go-Devils, I dove in. Surprisingly, it went smooth through removing accessories and head nuts/studs (some studs came out, as expected). 


It was when I went to pull the head that I ran into troubles. It simply didn't want to move at all. Queue three hours of prying, hammering, heating, and using copious amounts of PB Blaster. Still no go, but there is movement now. The head is stuck to one stud that refuses to release it's grip. 
After exhausting my arms (they feel like wet noodles now), I decided to call it a day. I got the head nice and hot around the stud, and tried to get as much PB Blaster down the stud to try and get it to release. I'll spend the week heating, spraying, prying. I'm sure I'll win, eventually. 


Sunday, 10 April 2022

Make sure it's in neutral

I had a few minutes out in the garage this weekend. My son was hanging around with me on Saturday, and he enjoys playing in the Jeep. Anyone with a kid will understand that keeping them occupied is the secret to getting things done. 

The agenda item was pulling the fuel pump and replacing it with a new unit to see if I can fix my fuel issues that I encountered during my attempt to start the Jeep


Yeah. Not good.

It's easy enough to swap a fuel pump the Go-Devil, pull the hoses, two bolts, and off it comes. Well, off it came, missing half of the pump arm. I can only assume that the arm is somewhere in the oil pan. Sigh. regardless, I setup the new pump and test fit it, but did not install it. I wanted to check the cam to make sure the lobe for the pump was still good. I popped my starter battery on the charger (I really need to buy a real battery) and called it a day. 


So Pretty.
Fast forward to Sunday. The battery is charged up, I have a few more minutes to myself, so I get ready to bump the starter and watch the cam turn through the fuel pump port. I pull the starter trigger and the Jeep lurches forward. Fortunately I have wheel chocks in the front and rear, so no damage was done, and it was in 1st not reverse, so my foot was spared. Also, no fuel, and the ignition was off. 
Evidently Nate decided that while playing army man, it would be wise to play with the gear shift and ended up leaving in gear. I didn't think to check. Totally my fault, and not a mistake I'll make again. 


So there you go, some freebie advice for the day, always make sure it's in neutral before bumping the starter. 

Sunday, 13 March 2022

Test firing the m38 Go-Devil engine

Why was it 2022 before I learned about how
great these are?
Today was the day, the Jeep m38 was finally at a point where I was ready to try and start it up. I have spent the past few (cold) winter months slowly rebuilding the carburetor as I had time. This weekend we shipped my son off to his Grandparents, allowing me much more time in the garage. I fired up the propane and electric heat, plus the overhead halogen lights, and got to work. 


I started by finishing off the carb build, and plumbing in enough fuel line to get a small tank hooked up to the pump, through a filter, and into the carb. Sadly, the pump seems to be shot, but I have a new in box one to go in. 

The carb took a bit of work, being 70 years old and all. The metering valve and needle did not want to come out. It involved a lot more drilling than a carb rebuild should require. 

Some wires were run to hook up the starter with a trigger start and a makeshift switch to the distributor. 

10 Gauge wire is recommended for all wiring except for the battery to starter, that should be 1 gauge. I went a little overboard (See my battery cables here: The Jeep Garage: Slow and steady Jeep m38 Progress)


I put a bit of two stroke fuel into the carb, and used some starting fluid to get it to pop off once. It was enough to convince me that we have a viable engine. It needs some work to button it up, and probably a head gasket (coolant in the oil), but it turns over, has spark, and enough compression to pop. 

And without further ado, a VERY short video of me pulling the trigger... so to speak.    

Monday, 6 September 2021

Slow and steady Jeep m38 Progress

 The longest journey begins with the smallest step. In my case, several small steps. Each one getting closer to a the goal. 

The m38 has been getting some work here and there over the past few months, as I have time, and as parts arrive. I have confirmed that it has been converted to 12v from 24v, the Canadian Tire Motomaster 12v distributor helped confirm that. 

The work has been minor, meaning, I haven't been too inclined to update here. So here's an update with a lot of small things. 


Parking Brake

I knew the existing parking brake needed to be replaced. The backing plate was bent, and it was no doubt worn right out. In the very least the cable was cut. Using the brake off the spare transfer case, I tried out some evapo-rust. Colour me impressed. The drum, backing plate, and salvageable parts, came out looking like they just came off the shelf. 


Battery Cables


With a rebuild of the electricals required, the ancient, rotted, battery cables just wouldn't cut it. Using some 1/0 welding cable, lugs, and marine style clamps, I build a fresh set of cables. Fully soldered together at both ends. Along with building the cables, I stripped out all the wiring on the passenger side of the engine, as it was a mix of old, brittle, and corroded. It's ready for a new wiring harness. I've also installed some brand new spark plug cables in preparation for first fire up. 

Electrical

The m38 didn't have a fuse panel, but I want one. I feel it's a worthwhile upgrade, and in terms of longevity, it just makes sense to go with something a bit more modern. I'm not aiming to make this Jeep a factory original restore. I want a reliable restored Jeep that I can enjoy. Being said, I ordered a 12 circuit universal fuse panel. I don't need 12 circuits, but it gives me some future proofing, should I decide to add a radio, CB, etc. 


Gauges

Can't go all in with all this fancy electrical and not replace the gauges. I sourced some out that had the elusive (at least it was for me) km/h markings on the speedometer. The kit included fresh gauges, wiring, and lights. I know the m38 originally had blackout/low light dash lights. Again, with modernizing, I want to be able to see my gauges while driving at night... that is, if I end up driving at night. 


POR15

Given that the frame was in good shape, I wanted to keep it that way. I returned to POR15 to make sure that I could seal the frame up, and protect it for as long as possible. I used an engine hoist, with some questionable riging, to lift the tub about 8" off the frame. It gave me more than enough room to treat the frame. I have a few places to still get to when I remove the fenders, but overall, it was one of those small things to knock off the list. 


Thursday, 24 June 2021

1952 m38 CDN

While browsing for old, affordable(Ha!), Jeeps, I came across an ad for Jeep m38 CDN (A Ford built, Canadian Jeep). It included a bunch of tools, spare parts, and had been partially restored, only needing brake lines, electrical, and a fuel system (yeah, right). The price was too good to pass up. The downside, it was around 3.5 hours away from me. 

After approval from the CFO (my wife), and a few messages back and forth, a deal was struck. I had agreed to buy a sight unseen, 69 year old Jeep. Next I had to figure out how to get it home.

Originally, I was going to rent a U-Haul truck and trailer, however my dad stepped in and offered himself, and his F250. 
This in of itself worked out well. It gave me a day to catch up with dad, enjoy some good music, and the open road. Due to the ongoing pandemic, I've practically never left my home, and have really only been interacting with my wife and son. It was nice to have a days break from that routine. 


Two days after the deal was made, we were on the road at 7am to get my Jeep. We picked up the trailer near the sellers location, and made our way down to meet the him. He was an incredible person to deal with, and felt like a guy I knew for years right off the bat. 

I fully underestimated the amount of extra "stuff" that was included in the deal. It worked out to a full workshop worth of tools, spare and new Jeep parts, a second engine and transmission. To sum it up. It took about two hours of loading parts and tools, plus a Jeep, before we were back on the road. 

Dad's truck had no trouble with the load, and comfortably cruised home without breaking a sweat. I had much more confidence in his truck, than any U-Haul truck I would've rented.

We were back in my driveway around 6:30pm. The Jeep was unloaded and man handled into its temporary parking spot, another hour of us unloading parts and tools followed. 


With that, I'm the proud owner of one of only 2300ish Ford built m38's. It's originally from New Brunswick, but registered in Ontario now. 

I guess it can be said, that I'm into my mid-life crisis, and this is my "little red corvette". Is it a practical vehicle, no. Is it a wise outlay of money, hell no. Does it make me smile ear to ear, absolutely.

Wednesday, 16 June 2021

Mid-life Crisis


Short post, and yeah, it's been ages. 

Got some planning to do, and some work to do, but I'd like to introduce you to a yet to be named new Jeep in my life. 

This is a 1952 Jeep m38 CDN. One of 2300 built by Ford for the Canadian military. 

As it sits, the body has been mostly restored. It needs brake lines, fuel lines, and an electrical harness done up for it. 


Keep checking in for updates, and hopefully some YouTube videos, as I bring this piece of history back to life.